
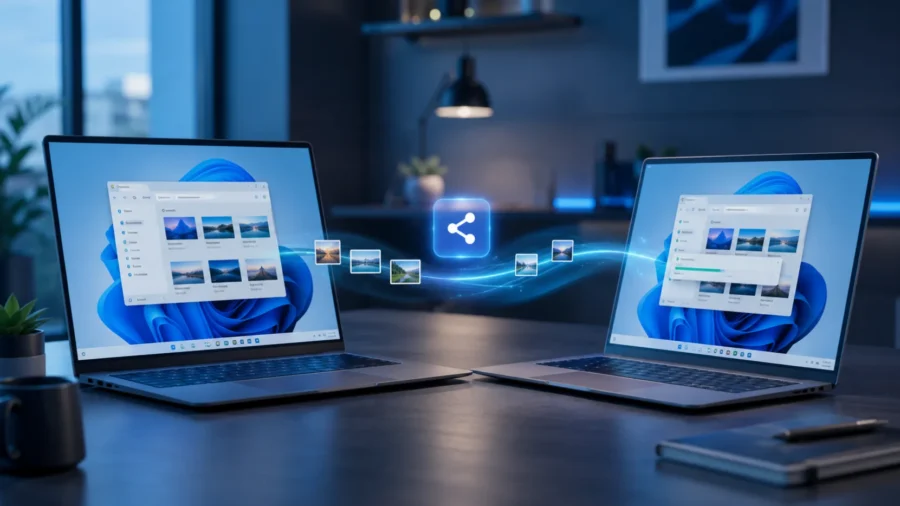
You don’t always have to use a USB stick, email or cloud storage to send files in Windows. If you want to quickly share documents, photos, or links between two Windows computers in the same environment, Windows’ built-in Nearby Sharing feature can come in handy. This feature works over Bluetooth and Wi-Fi. In other words, wireless file sharing can be done between Windows 10 and Windows 11 computers without installing an additional application.
What is Nearby Sharing? Nearby Sharing can be considered as Windows’ built-in file sharing feature, similar to AirDrop in the Apple ecosystem. It makes it easy to send files between Windows devices that are in the same room, the same office, or located close to each other. There is an important point to note here. Windows’ Nearby Sharing feature is not the same as Google’s Quick Share feature used between Android and Windows.
Nearby Sharing in Windows basically works between Windows computers. If you want to send files between an Android phone and a Windows computer, you need to use Google’s Quick Share application. How to turn on Nearby Sharing? To use the feature, Nearby Sharing must be turned on on both the computer that sends the file and the computer that will receive the file. In Windows 11, follow these steps: Open the Start menu. Enter the Settings application.
Open the system partition. Click Nearby Sharing. Choose your sharing preference. There are three options here. Off: Nearby Sharing is disabled. Only my devices: Sharing is possible only with the devices you are signed in with the same Microsoft account. Everyone nearby: Sharing can be done with compatible Windows devices in the environment. For security purposes, the My devices only option is a more controlled choice in daily use.
However, if you are going to send a file to your friend or colleague’s computer, you can use the Everyone nearby option for a short time. It is also possible to turn it on from quick settings. You do not have to open Nearby Sharing from the Settings menu every time. You can also enable this feature from the quick settings panel at the bottom right of the taskbar in Windows 11. To do this: Click on the area with the network, sound or battery icons at the bottom right of the taskbar.
Open the quick settings panel. Find the Nearby Share button. Turn the feature on by clicking the button. If you cannot see the button, you can add the Nearby Sharing shortcut by editing the quick settings panel. How to send a file? Sending a file with Nearby Sharing is quite simple. Once the feature is turned on, the operation can be done directly through File Explorer. The steps are as follows: Open File Explorer. Find the file you want to send.
Right click on the file. Click on Share. In the sharing window that opens, select the nearby device. Accept the notification that appears on the other computer. Use Save or Save and open on the receiving device. Where are the files saved? Files that come with Nearby Sharing are usually saved in the Downloads folder by default. However, you can change the recording location in the Settings System Nearby Sharing section.
For example, if you frequently receive work files, it may be more organized to create a special folder on the desktop or in the documents folder and direct the incoming files there. What to do if the device is not visible? Sometimes Nearby Sharing may not show the surrounding device immediately. In this case, it is necessary to make a few basic checks: Make sure Bluetooth and Wi-Fi are turned on on both computers. Make sure the devices are close to each other.
Make sure Nearby Sharing is turned on on both computers. Try temporarily changing the sharing permission to “Everyone nearby” instead of “My devices only.” Check for Windows updates and Bluetooth/Wi-Fi drivers. Is Nearby Sharing safe? Nearby Sharing offers a more secure and controlled structure, especially when used with the “Only my devices” option. However, it may not be a good idea to leave the “Everyone nearby” option on all the time.
This option may cause other Windows devices in the area to see your device in the sharing list. Therefore, the best way to use it is as follows: For daily use, keep the Only my devices option open. Temporarily use the Anyone nearby option when you need to send a file to someone else. When you’re done, go back to the more limited option or turn off the feature. Conclusion: A practical solution for small files and fast transfers.
Windows’ Nearby Sharing feature is especially useful for sending fast files between two Windows computers in the same environment. Instead of searching for a USB stick, emailing yourself, or uploading the file to the cloud, you can share in a few clicks. Of course, this feature does not replace Google Quick Share, which is designed to share files with Android phones. But if you want to send documents, photos, and links between Windows computers, Windows 11’s built-in Nearby Sharing feature may be more than sufficient for daily use.


Comments
You can write your views about this story. Comments may be moderated according to site settings.